So geht's: Zunächst die Fläche abmessen und die Fliesen passend zuschneiden.Ina Fassbender/dpa-tmn
Editor's Note
This editor’s note highlights the key facts and market implications behind “Color, Film, or New Tiles – A New Tile Splashbac”, with emphasis on sourcing, product fit, fabrication, logistics, or buyer impact.
After many years or decades, do you no longer like your bathroom or kitchen tiles? You can either hire a specialist company for a modernization – which can be expensive – or you can take matters into your own hands. Laying new tiles, or simply painting, varnishing, or covering them with adhesive film – these are the options for someone wanting to spruce up their bathroom or kitchen. But which method is suitable for whom? And what should you be aware of?
Sprucing Up an Old Tile Splashback with Paint or Film
Those who opt for paint can find tile varnish in hardware stores that adheres well. "A clean substrate, a clean environment, and clean tools are important – otherwise every bit of lint will be painted over," says Christian Meyer, editor at the magazine "selbst ist der Mann".
According to him, drying times can vary – here is a rough guide: After twelve hours, surfaces can usually be painted again if needed. After 24 hours, surfaces are generally waterproof. After four to five days, the paint is fully cured.
However: In the so-called splash water area, such as around the shower, painting or varnishing tiles only works to a limited extent, says Robert Raschke-Kremer, trainer at the DIY Academy in Cologne. "In that area, the paint or varnish risks flaking off over time."
Besides paint and varnish specifically for tiles, there are also self-adhesive tile films in various formats. Here too, a clean, dust-free, and grease-free substrate is important. So clean the area thoroughly beforehand. "And then a good eye is required when applying the film," says Meyer. Precise work is important so the film covers the individual tiles.
Laying New Tiles – Get Tips from Professionals
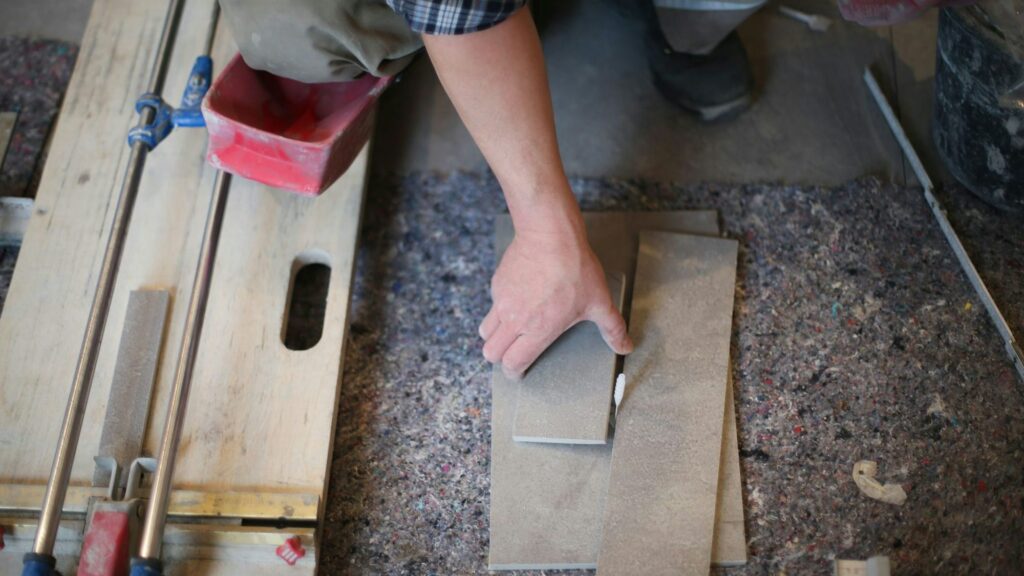
Would you prefer to tile your bathroom or kitchen anew? Then you also need a good eye, patience, manual skill – and of course, the right accessories. Among other things, you need this tool:
So geht's: Zunächst die Fläche abmessen und die Fliesen passend zuschneiden.Ina Fassbender/dpa-tmn
Mason's trowel for working mortar Notched trowel for applying the adhesive bed Mixing paddle on a drill – for mixing adhesive and grout Spirit level or a straightedge about two meters long Tile cutter to bring tiles to the right size Tile hole punch to work on pre-drilled holes in tiles Grout float to spread the grout into the joints Sponge board – for the final cleaning of the tile surface Knee pads – are recommended and make the work easier Once the materials and tools are ready, you can basically get started. However, before DIYers begin with individual work steps, they should find out exactly how to tile walls and floors – to prevent later damage and ensure the end result looks good. A first insight can be provided by videos and tutorials online. Good sources to deepen knowledge and get instruction are specialist literature, courses at hardware stores, or with DIY professionals. Such courses can be found online. Tip: enter your own postal code when searching.
Prepare the Substrate Well
To ensure the end result isn't crooked and uneven – preparing the substrate is particularly important. Robert Raschke-Kremer gives more detailed tips: "Minor unevenness up to three millimeters can be leveled with tile adhesive," says the DIY trainer.
To ensure tiles adhere well, you should check the absorbency of the substrate. To do this, spray the surface of the substrate with water. "If the water beads off, the substrate is not absorbent." Then you need to apply a bonding primer.
So geht's: Zunächst die Fläche abmessen und die Fliesen passend zuschneiden.Ina Fassbender/dpa-tmn
Whether the surface is load-bearing and thus stable is shown by the so-called cross-cut test: For this, make horizontal and vertical cuts with a sharp knife into the substrate. "If there is chipping in the corner areas, it's an indication that the substrate is not load-bearing," says Raschke-Kremer. The respective spots should then be sanded down.
With a tapping test, DIYers can also find out if the substrate has hollow spots. For this, tap the substrate with a small hammer. At audible hollow spots, these must be filled with repair mortar.
Plan Enough Time
After checking the substrate, it's time for priming. For this, establish a reference line for the first row of tiles. "This depends on the tile and the respective area dimensions," says Meyer. You should choose it so that nowhere at the edges are overly narrow cuts necessary and tiles ideally end equally wide at the sides – this looks better aesthetically.
It is important that DIYers bring patience and realistically calculate the time required. "Beginners should plan for two working hours per square meter of area to be tiled," advises Robert Raschke-Kremer. Regarding the drying phase: The primer should harden for at least one night.
For the subsequent tile laying, according to Christian Meyer, there are fast-setting adhesives and mortars that are walkable after just three hours – with standard adhesives, this takes about one to two days. "But almost all tiles are only fully load-bearing seven days after laying," says Meyer.
“Important are coordinated materials and suitable tools,” says Christian Meyer and lists what material is needed: “Suitable tiles, matching tile adhesive and grout, as well as silicone.”
How it's done: First measure the area and cut the tiles to fit.