Editor's Note
This editor’s note highlights the key facts and market implications behind “Peel-and-Stick Tiles Never Fooled Me. Then I Tri”, with emphasis on sourcing, product fit, fabrication, logistics, or buyer impact.
Last summer, while browsing online to help my sister with a home renovation (giving free advice is one peril of being a designer-turned-writer), I stumbled upon a gorgeous photo of mother-of-pearl tiles in an airy, bright bathroom. I was shocked to learn that they were actually peel-and-stick tiles and not the real thing. When I worked in interior design, I sometimes used adhesive peel-and-stick tiles for quick staging jobs, but these looked nothing like the vinyl or gel-resin sheets I was used to. Those peel-and-stick sheets offered a fast, dramatic, renovation-free transformation, but up close, no one would be fooled into thinking they were real. But those pretty mother-of-pearl tiles were real — and they were also peel-and-stick. I was curious to see if they indeed looked classy, not cheap, in real life, and if they’d be as easy to install as their vinyl counterparts. After considering dozens of peel-and-stick mother-of-pearl tiles online, I chose to test some sold by Kasaro that are highly rated and widely available on Amazon and Wayfair. Kasaro claims that its tiles, made with mother-of-pearl from Chinese farmed oysters, are easy to install and suitable for wet environments, like a shower or backsplash. But what enticed me most was the implicit promise that for a fraction of the cost of a real tile renovation, they might deliver a high-end and permanent-looking makeover, with far less hassle. I tested the Kasaro tiles in natural and white, installing them in my bathroom and on a kitchen backsplash. They’re definitely an aesthetic success — yes, even up close. But while they’re much simpler than grouted tile to put up, installation isn’t exactly easy. This, plus their roughly $10-per-square-foot price tag, makes them best for someone who is invested in a lasting makeover.

Kasaro Mother-of-Pearl Peel and Stick Tile
This stick-on wall tile comes in sheets, with a backing that covers uneven surfaces. It’s not cheap, but it effectively upgrades a space, no grout needed.
The tiles are gorgeous and convincing on the wall
My immediate impression was that the Kasaro wall tiles looked as good up close as they did online. Each mother-of-pearl tile appeared naturally imperfect, cut and polished into varied thicknesses of about 2 mm. The 0.75-inch squares are arranged on a square-foot sheet with a mesh and foam substrate. Together, the sheets had a lustrous visual dimension that reminded me of Moroccan Zellige tiles, which flat vinyl cannot replicate. When I broke a few of the tiles apart with a hammer, they sheared off in iridescent layers, consistent with what you’d expect from authentic mother-of-pearl. The 0.75-inch mother-of-pearl squares, shown here in natural, come in square-foot sheets that are appealingly dimensional. The tiles are mounted on a mesh backing and a strong adhesive foam layer.

Once installed, the tiles gave a light-reflecting makeover to otherwise dark or dull areas. I tested the tiles in white in a kitchen at Wirecutter’s office (covering a gray composite backsplash), and the transformation was remarkable. Not only did the area get brighter, but the mood of the once-mundane room (no offense to our office) seemed more elevated. What’s more, when colleagues walked into the upgraded kitchen, several thought I’d installed grouted tile. Mission accomplished. The mother-of-pearl tiles, shown here in white, add texture and catch light, brightening the room. The varied, shimmering surface makes the tile look high end. While mother-of-pearl doesn’t align with every aesthetic, even my skeptical husband was sold when he saw the Kasaro sheets I was testing in our bathroom. The way the neutral-toned mother-of-pearl tiles caught the light was sophisticated but organic. Overall, I found that the Kasaro tiles were relatively easy to install without looking overtly DIY. One common problem with applying peel-and-stick tiles to uneven surfaces is that their thin vinyl material can show flaws and develop bubbles. I didn’t experience that with the mother-of-pearl sheets. The stiff tiles themselves can’t bubble, and the thick adhesive layer they’re attached to has some give, so you can stretch it over a wall’s surface imperfections.

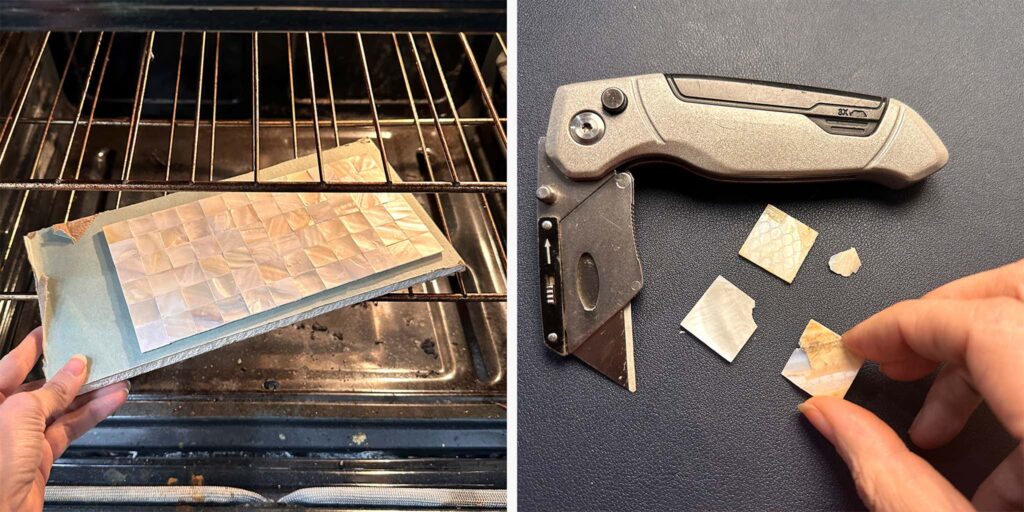
First, it’s important to get the placement right on the first try. The adhesive on the Kasaro tiles is extremely strong and bonded immediately to my bathroom’s plaster wall. While this gives me confidence in the stickers’ longevity, it means that repositioning after you remove the backing is not really an option. When I tried to peel off a sheet and adjust its position, parts of the adhesive foam tore and stayed fused to the wall. That corner of the sheet became unusable, and the residue was time-consuming to remove. To complicate things, the sheets’ irregular edges (which add to their aesthetic success) are finicky to line up. It takes some effort to ensure that seams or gaps are minimal between them. I found it especially tricky when I installed the tiles on the laminate backsplash, where, despite my fiercest efforts, the seams were still slightly visible. In our guide to installing peel-and-stick tile, we recommend caulking between seams for a more realistic (and more water-tight) finish; you’ll probably want to do that with the Kasaro tiles. Or you can do what longtime Wirecutter writer and DIY Tim Heffernan suggested to me while I was testing these tiles: Use all-purpose glue, to great effect. Depending on the color of your tile, you might also add some acrylic paint to your glue for color. Whether you use caulk or glue, the additional effort to fill your seams will have a major impact in making the tile installation look complete and convincing. Due to the irregular edges of the tiles, seams are inevitable (left). I used an all-purpose glue and a palette knife to fill in the cracks.
Source: Read the original article | Published: February 19, 2026